Get the latest news other tips
Tips for QuickBooks Users
QuickBooks: Sales Receipts, Invoices, and Statements
When you buy something at a store, you want a piece of paper that shows what you purchased and what you paid. If you receive products or services before you pay for them, you certainly expect to receive a bill. And if you have several transactions with the same company and want clarification on what you've paid, and what you owe for a specific period, the company can usually send you a summary.
Your customers want the same things. That financial documentation might be difficult for you to provide if you're still doing your accounting manually on paper.
Fortunately, QuickBooks has a solution - or, rather, several solutions. The software includes templates for all of the sales forms that you'll probably ever need: invoices, sales receipts, and statements. Here's an introduction to when and how to use them:
Sales Receipts
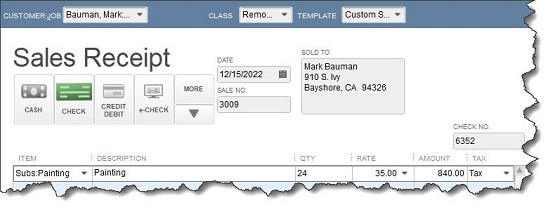
When you receive full payment for a product or service at the time of the sale, the correct form to use in QuickBooks is the Sales Receipt. Click the Create Sales Receipts icon on the home page or open the Customers menu and select Enter Sales Receipts. You'll see a form like the partial one pictured above.
Click the down arrow in the Customer:Job field and select the correct one or . If you assign transactions to Classes, pick the right one in that list. The Template field should default to the appropriate form. If you've created more than one sales receipt template, select the one that you want. Click the icon above the correct payment type.
Tip: Want to be able to accept credit cards and eChecks? You're likely to get paid faster by some customers. You'll also be able to accept payments on your smartphone or tablet and create receipts. Talk to us about adding this capability.
Select the appropriate Item(s) from that drop-down list and enter a Qty (Quantity). Be sure to apply the sale's Tax status by opening that list. (If you know that you're responsible for paying sales tax on at least some of your sales but you haven't set this tracking up in QuickBooks yet, we can work with you on that. It's important.) When you've finished filling in the table with all the goods or services you sold, you can save the transaction and either print it or email it to your customer.
Invoices
You'll create and send Invoices to customers when you've received either a partial payment or no payment at the time of the sale. Those completed transactions become a part of your total Accounts Receivable (money owed to you). Click Create Invoices on the home page or go to Customers | Create Invoices. Fill out the fields at the top of the screen like you did with your sales receipt; the forms are almost the same. Invoices, though, have Bill To and Ship To addresses, as well as fields for the sale's Terms and Due Date.
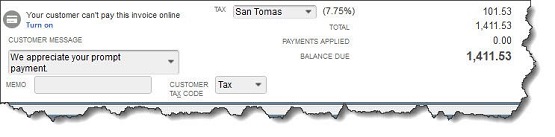
You shouldn't have to do anything with the bottom half of the screen (pictured above) unless you want to include a Customer Message, since the information here is carried over from the top of the screen. Check to make sure the Tax Code is correct, though.
Statements
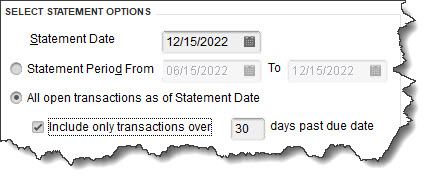
Statements are very useful when you have multiple customers who are past due on their payments (you can find this out by running the A/R Aging Summary report, which you'll find under Reports | Customers & Receivables). Click the Statements link on the home page or go to Customers | Create Statements. You'll first have to select the customer(s) who should be on your list, as pictured above. Several other options on this page will help you refine this group. When you're done, QuickBooks will automatically generate them, and you can print or email them.
We want to hear from you!
Click the link below to schedule a consultation with Biz Universal.